 Removing the plug from a Sharp vacuum cleaner is one of the easiest repairs you can do on a vacuum cleaner.
The parts of the vacuum cleaner that you need to check for dirt are easily accessible. Any tools are usually not required for this activity.
These repair instructions apply to the Sharp Twin Energy upright vacuum cleaner series. You should avoid using this vacuum cleaner until you unplug it.
Motors burn over time and running the vacuum cleaner when it is clogged speeds up the process.
Choose the best vacuum cleaner which contains good quality.
Steps to repair the sharp vacuum cleaner
Be sure to keep track of your vacuum bag. Overfilling a Sharp vacuum bag will cause dirt particles to form in the vacuum tube. And that harms the cleanability of your vacuum cleaner.
Do not fill these bags more than half full, and do not reuse a disposable vacuum bag. If a vacuum bag breaks into a Sharp vertical vacuum, the motor will damage.
Step 1
Plug the vacuum cleaner. And remove the front panel of the vacuum cleaner and expose the area of the vacuum bag.
Step 2
Remove and discard the vacuum bag. A sharp vacuum bag should never be more than half full. Otherwise, the suction force of the vacuum will start to reduce.
These pockets can be small, but keep an eye on this area of the void. An overfilled or broken vacuum bag will sooner or later cause engine problems, which can be an expensive repair.
After removing the bag, check and remove any residue that accumulated in the vacuum cleaner.
Also, make sure that the filter is firmly attached to the bottom and not covered by any dirt. The engine locates under the filter. Put a new vacuum bag back in the machine before closing this space.
Step 3
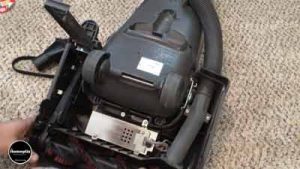
The next area you want to check is on the bottom of the vacuum cleaner. Remove the suction hose from the underside of the machine (as with the integrated accessories). Check the pipe and the area you just removed for dirt.
When using the pliers to remove debris, be careful not to pierce the vacuum tube. The straw corresponds to the basic image.
Step 4
Flip the vacuum cleaner over on a surface that you can access the bottom of the vacuum cleaner. Remove the bottom square.
Check for dirt behind the roller on the left. If you have trouble removing dirt, remove the two screws to separate the vacuum tube base from the vacuum base housing. Put your vacuum cleaner back in.
If the vacuum is still clogged, repeat the previous step. If you’re still having problems, you might need to take it to a vacuum cleaner repair shop.

Writer, traveler, and activist John L. Turner is the author of five books about outdoors, sports, home, power, uprisings, art, environment, place, pleasure, and hope. He is a contributor @homeplix.