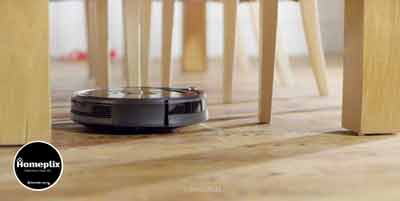
Roomba Robotic Vacuum Cleaner makes cleaning the house much easier and faster. But whoever is looking for a Roomba or Deebot robot vacuum cleaner, it is important to know that life will not magically and constantly become easier.
The problem with your Roomba may still occur, especially if you do not clean daily. Below are a few comparatively simple Roomba troubleshooting & repair guidelines, that is, getting your petty robotic domestic attendant up and running again.
The most common problem indicated by Roomba owners is its battery. There may come a point when the unit does not seem capable of holding any charge. Some people advise resetting and cycling the unit, which is done by removing the battery, press down the clean button for 5 to 15 seconds, restore the battery, and charging the Roomba until the power indicator light becomes green again. Once this happens, keep the Roomba charging for an extra 72 hours, without obstacles. However, in this case of DEEBOT N79, the indicator light glows a continuous BLUE.
Afterward, the Roomba should run evermore until the battery is Runs out. The process should then be repeated a couple more times until an improvement is seen. If nothing happens, you have to purchase a new battery.
Other most common problems with the Roomba include having Fiber or hair tangled within, which take down its performance. If this happens, it is consulted to clean the unit with compressed air. If the unit still doesn’t act properly, the following guide teaches you how to repair and troubleshoot your Roomba.

Contents
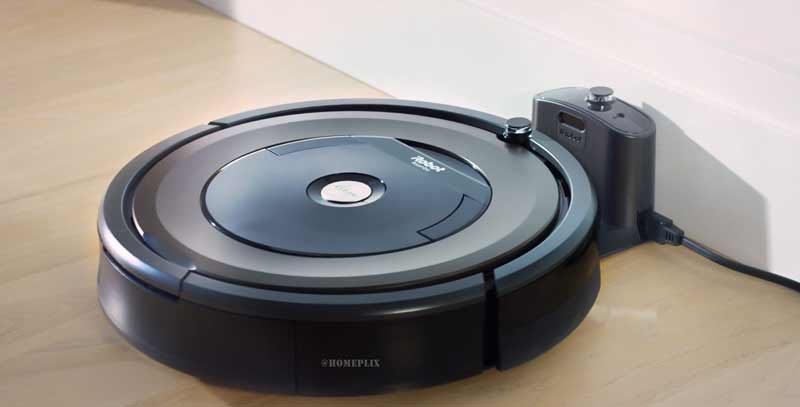
Roomba Won’t Dock
Won’t your Roomba come back to the Home Base once a cleaning cycle is complete? check the following:
- Inspect well the charger line cable and look for any damage.
- Plug the charger into a wall socket and confirm that the power indicator lights up solid green.
- Plug the charger into the home base to make sure that it is completely inserted with a solid fit. Verify the power indicator starts flicking on an average once every 4 seconds and then shuts off. This is a common characteristic, designed to save energy.
- Make sure there is no virtual wall, Virtual Wall Lighthouses or other Home Bases staying within 8 ft (2.4 m) of the Home Base that could produce infrared beam obstacles.
- Implant the Home Base in an open area.
- Make sure there are no exotic objects on the bumper or home base.
- Clean the charging contacts on the Home Base and robot with a dry cloth to remove any debris.
- Confirm Roomba can come-back to its Home Base manually by placing Roomba within 6 ft of the Home Base and pressing Dock.
If Roomba is going departed Virtual Walls, confirm that the Virtual Wall is turned on and the beam is facing the exact approach of the aimed area to block.
What’s the difference between a traditional vacuum and the best robot vacuum for hardwood floors? Basically, their docking and charging system must be different.
Because In one cleaning cycle Roomba needs to clean multiple hardwood floors, Roomba may not be able to end up a mission complete, that’s why Roomba introduces an auto docking technology.
Roomba Won’t Turn On
If your iRobot vacuum facing any of the following problems, let’s check if it is not turning on, not charging, or is not responding in any way.
If this is happening with a Just unboxed robot that has never been activated, the battery may have displaced during shipment. We suggest taking off the battery and placing it back in the robot to confirm the proper contact.
Plugin the Home Base and verify indicator light on Home Base starts flicking near about once every 4 seconds, or expose solid for 4 seconds and then go away.
If the light does not fire, try charging in a second outlet, and test the charger or Home Baseline cable for any damage. If the charging base still does not open, you may need a replacement.
If the Home Base light illuminates but the robot is not yet charged, check if there has been any debris or dirt on the charging communications. If available, use a soft dry cloth to remove any debris from the charging contacts.
Please remove the robot from the charging base. Turn over the robot and remove the caster wheel. Make sure that there is no debris in the caster wheel since it cannot reach robots for charging contacts. If debris found please watch the caster wheel.
Place the Roomba on the home base, and charge Roomba for at least one hour. If the troubleshooting indicator begins to flicker and Roomba creates an error message while charging, please monitor the charging error messages chart.
If your Roomba will not be charged on base and won’t hold a charge anymore, potential problems include.
- Contact dust
- The wrong type of battery
- Power source problems
Roomba will notify an error code about the error, and you can easily solve the problem without a lot of trouble.
On the other hand, Deebot is another robotic vacuum like Roomba, encountered the same charging error. When it occurs Deebot will notify that the Deebot not charging.
Make sure the base connected to the power
You see that the home base is plugged and Roomba is not charging, then there will be a light of electricity. If it does not, then make confirm that, it has its power.
You may have plugged the home base into a Ground-Fault Circuit Interrupters (GFCI) outlet, which has been moveable. Maybe that due to the break of a circuit, dislocated can be done for any reason. If the GFCI outlet has the power, the plug is tightly sealed in the outlet. You need to plug the home base to another outlet, to verify that this is working.
Learn about Error Code
If the Roomba is Correctly charging, you won’t notice any lights. These are intentionally closed to conserve energy.
Anyway, if there is a problem, the Roomba will say “uh-oh,” and a troubleshooting light will flicker. The number of times it blinks gradually alarms you to the error. The device will also say the error code.
You should know, there are eight such error codes. You can get support from this most solution by opening the iRobot application on your mobile device or PC.
Error Code 1: Code 1 error occurs when the base station and battery cannot communicate. You may forget to disconnect the yellow pull-tab before placing the Roomba on the home base. This can also happen because the battery is not installed correctly. Eject it, and reconnect it.
Codes 6 and 7: If you notice that the Roomba battery is too hot or too cold, it won’t charge. If the battery will produce too heat Roomba will speak Code 6 and a Code 7 if it’s too warm or too cold. Disconnect Roomba from the home base and allow it to rest at room temperature for half an hour before trying to reconnect it again.
Codes 2, 3, 5, 8 and 9: Five of the error codes inform either a contact problem between the home base and the battery or a difficulty with the battery itself. You can fix this error by cleaning the contact on the home base on the i-Robot Roomba. After unplugging the home base, massage it with damp cloth or alcohol mixed cloth.
Try a Hard Reboot
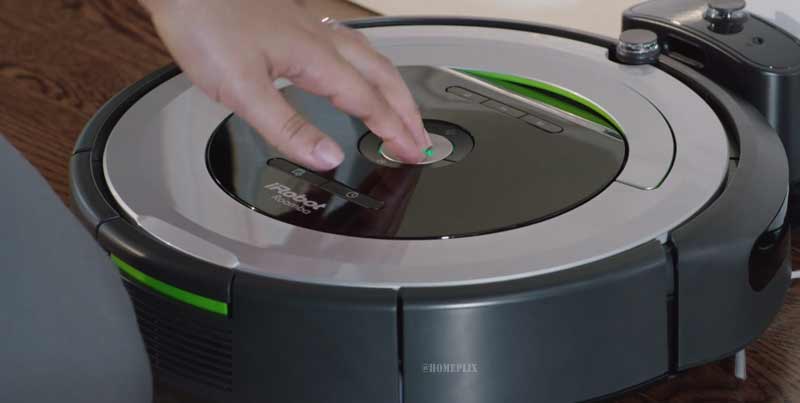
Charging errors can occur due to corrupted memory in Roomba’s processors. You can solve the bugs by rebooting the device. For this, press the CLEAN button down for 10 seconds. Release it when all the indicator lights will float. The device will then restart. It will not save schedules and other settings, so you have to reorder them.
Be Patient When Charging a New Battery
A fresh lithium-ion battery won’t work until you wake it up. Set the home base station on a level floor and plug in the socket, and see that the light comes on.
Place Roomba on the home base station and wait for few seconds until the battery wakes up. When it does, the light on the base station will go out, and the battery indicator on Roomba will begin flickering. It too will go out after a minute.
Battery Status
- CLEAN button indicates how much charge battery has.
- Red that means the battery is hungry.
- Flashing amber indicator that the charge is in progress.
- When charging is complete indicates green.
- If Roomba rapt the 15-hours charging condition, a quickly flickering amber light indicates, which it does Consistently to lengthen the life of the battery.
Roomba Errors
| Roomba Error | Possible Problems | Possible Fixes |
|---|---|---|
| Roomba Error 1 | Battery | Clean Battery Contacts & Reset |
| Roomba Error 2 | Brushes | Clean Brushes |
| Roomba Error 3 | Stalling | Reset & Recharge |
| Roomba Error 5 | Charging | Remove Yellow Pull-Tab |
| Roomba Error 6 | Sensors | Clean Sensors & Reset Roomba |
| Roomba Error 9 | Bumpers | Clean & Reset |
| Roomba Error 10 | Wheels | Clean Wheels |
| Roomba Error 17 | Geographical Difficulty | Remove problem areas, Increase Lighting, Clean |
Roomba Brush Not Spinning
Does your iRobot side brush does not spin? What are you afraid of using the right method to solve the problem? Well, if you are struggling with these problems, then you have come to the right place. You can follow the steps below. Handle the problem fast.
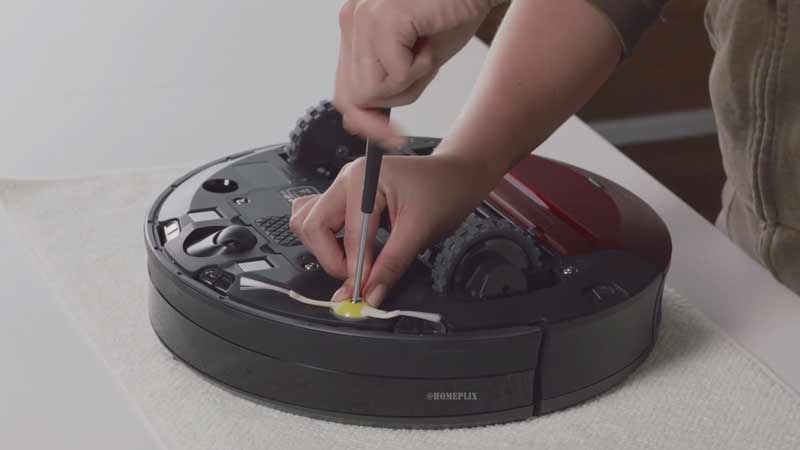
Step 1
The first step to take is to turn the i-robot on its side. Go ahead and Take off the side brush by removing the center screw with a flat head screwdriver. The bottom panel holds four screws, try to take off.
Step 2
The side brush motor and blue housing are occupied in the chamber by two screws at the edges and there is a slit head third screw. Take the engine out upon loosening the two bolts. Electricity is provided by two spring controls below the engine chamber because there is no concern.
Step 3
Take off the third screw. Then the third bolt comes with a triangular slot. You should know a simple flat-head screwdriver will not work to loosen it. You have to be cautious at this point not to harm the head. The third slit screw comes with a little plastic part that keeps the motor in its chamber.
Step 4
Blue motor housing comes in two pieces. A snap-latch is visible at one end. While following the edges around and supervising it cautiously.
You will detect that a thin flat head screwdriver can be placed on the other side of the housing. You can carefully prise up one part of the motor housing off! Be sure to complete this task mildly to prevent the harm of the snap-latch. One section of the housing contains some gears and an electric motor. The other part of the housing contains a metal axle and one wide gear.
It also discloses a hexagonal piece protruding from the other portion of the housing where the side brush mounts.
You can first google it with your hand and later pliers, to find out if the axle will turn within the housing. When this task is complete, the axle will not rotate within the housing. You will detect that the axle will spin once freed from the other stuck gear when testing the motor with a 9-volt battery.
Step 5
You can give some WD-9-0 to lose the stuck gear. Try to crack the stuck section. After some time, you will discover it’s possible to turn the stuck gear in the housing.
It will be hard to pop the gear out in any way. Even, you can continue twisting and turning it incessantly. With exact inspection, you will find in between the blue housing and the white part some fine broken stuff. The housing cleaned and the motor can be changed to get your Robot Roomba brush working back. The problem is solved.
How to Reset Roomba
Reset the Roomba
If you have marked that your robot was not cleaned during the same time if you have observed that it has reduced the performance, you have to reset your Roomba.
Do not change the battery of your Roomba, before a reset, to be sure that the problem is the battery.
To do a hard reset, you must follow the steps.
Step 1
Place on the charge of your robot. Place it on the Home base. or connect the charger directly to the Robot.
Step 2
Press the button ‘CLEAN’, for approximately 10 seconds and keep hold until the blue text ‘r 5Y’ is displayed.
Step 3
When displayed ‘r 5 P’ leave ‘CLEAN’ then your Roomba turns off and you will hear a ‘BEEP’ tone. These tones are sure that the reset was successful.
Step 4
Prevent from loading Robot for 16 hours and start it. It is possible that it improves performance and your Roomba to return as earlier.
It is important to keep in mind that with this operating your Roomba is with the factory settings. You will need to reprogram it again, Task Scheduler, clock, and language.
Roomba Bumper Stuck
I’m awaiting that someone has run into the Roomba bumper stuck problem shown as Roomba error 9 before and I can tell you what you need to do to solve those issues.
What happened in my case? When I get the Roomba to clean it starts walking around in large range as it’s supposed to, and then starts to wander. The problem is that the front bumper claps something it gets stuck and just spins and jerks back and forth.
If I try and operate it with the remote once this has happened I find I can turn left or right without any difficulty, but I try and move forward it just spins to the left to left.
If I shut it off, also from the Power button or the remote, and then start it back, it runs fine until once again the bumper is triggered. I think that it’s not Contact isolation or something grating lose since turning it off via the remote or application and then back on wouldn’t cause the Roomba to be pushed at all. If I press the bumper very mildly with my finger the same thing happens.
I can fix that and I don’t have to send it off somewhere for service. Now I will tell you, how is that possible.
The above scenario shows a Roomba with a stuck front bumper sensor. As you can see, the robot keeps backing up and trying to turn away from it.
The penumbra interruption it thinks is in front of it. This specific bumper sensor was triggering because lint had stuck into the optical beam path and that was blocking light to the photodiode detector even when the bumper was not being zapped.
I am able to fix the bumper cover by removing four screws and its vacuuming where the bumpers to the plastic poles go through IR diodes and the phototransistor.
I found the following guides to be very useful to you when debugging the sensors on your Roomba to a condition in which the front bump detectors were malfunctioning.
Short Brief
Hold the spot and ‘Clean’ buttons down together. Push the power switch. Keep pressing spot and clean buttons down while the robot sounds five ascending beeps and five descending beeps. Release spot/clean and you are in diagnostic mode.
How to Clean a Roomba
Sometimes your cleaning equipment needs to be cleaned. This is surely true of your Roomba. With just a bit of daily maintenance.
What needs to be cleaned
- Tray
- Filter
- Side-sweeper
- Brush
- Rubber roller
- Underside
- Motor
Empty your Roomba
On the backside of your Roomba, there is a tray that fills with dirt and dust as it vacuums. Press down the button on top of this tray and take it out. Dump the dust off this tray into the dustbin.
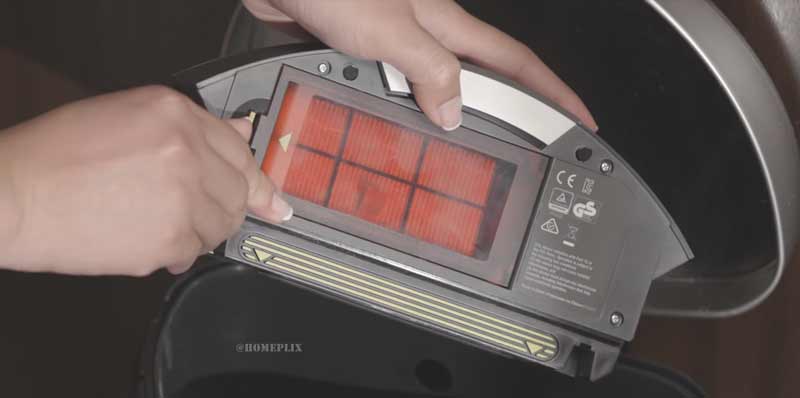
Remove the filter
Inside the tray, you will be able to see a red semi-circle. That may be dressed with gray dirt and dust. This is a Roomba filter, this filter will without difficulty take out of the tray while remaining attached on one end. Slide this out, and throw out any loose dirt/dust off into the dustbin.
Vacuum the tray and filter using a regular vacuum and the crevice tool
Attach the fracture tool to the hose of a vacuum cleaner. Then turn the vacuum on and use this attachment to remove dirt and daub from the Roomba collection tray and filter.
Switch to the brush tool
Attach the brush tool instead of the crevice tool from your vacuum hose. Restart your vacuum and once again go over the filter and tray. At this moment, pay attention to the rubber seals, the surface of the filter and the vents on the back of the tray. When you are finished, snap the filter back into place.
Remove the side-sweeper
Down the Roomba Downward, and Marked the side-sweeper. A circular on the top left of your Roomba, three marginal plastic pieces. Using your Phillips screwdriver remove the side-sweeper. Using your fingers or your crevice tool, clean off any hair/debris or dust that is attached to the side.
Remove the front wheel
The front-wheel- Located front and center on the bottom of the Roomba. You can easily pop it out. Use your fingers to remove any hair or string attached to the wheel itself. Then use your vacuum with the crevice tool to vacuum the opening where the wheel goes.
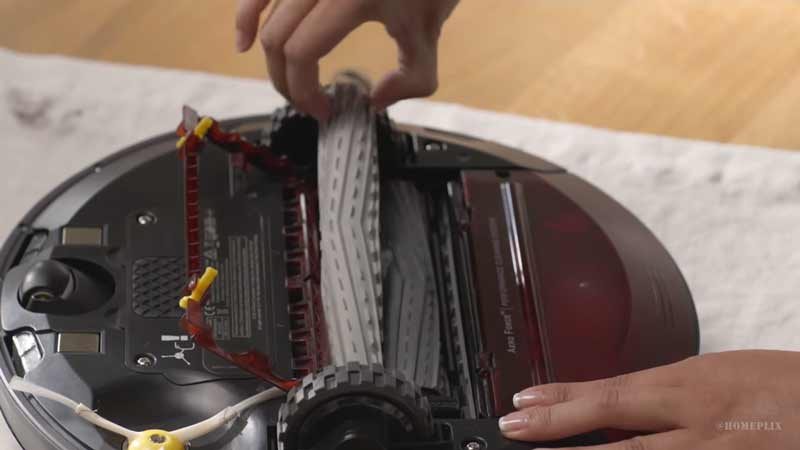
Remove the brush
You will mark a rectangular flap, On the bottom of your Roomba, that should lift open. Under this flap, you will get your cylinder brush, which can be very dirty. Take up this brush.
Remove the bearings
Both sides of your brushes will be small bearings at the end. (On some Roomba models, these bearings are yellow). Take of these bearings and set them safely. Then, using your finger, pull off any hair that has gotten tangled with the bristles and around the ends of your brush.
Use the iRobot Roomba bristle brush
Slide the bristle brush onto the end of your cylindrical brush to remove the iRobot Roomba. Pull the bristle brush down the length of your cylindrical brush just to remove hair, debris, and dust. Remove the hair/debris from the bristle brush with your fingers, and run over this process 2-3 more times.
Remove the rubber roller
The bottom of the space placed in the cylinder brush, you will notice a cylindrical rubber roller. This will slide out. Take apart the yellow bearings, and pull off any dirt/hair from the ends of the rubber roller.
Vacuum the brush, roller, and compartment
Use brush attachments on your vacuum to move the brush and roller all the way to remove dust, dirt, and hair. Move brush and roller aside, and switch your tool. Now vacuum the compartment where the brush and the roller go, giving a careful focus to the gray flap that seals the compartment.
Deep Cleaning the Underside and Motor
Clean the backsides of the wheels. You do not need to take off the rear two wheels in order to clean them. Instead, push the left wheel down and use the crevice tool to vacuum around it. Repeat this on the other side.
Remove the bottom cover
Using your Phillips head screwdriver, open the four small screws that hold the black bottom cover in place. These screws may be a bit hard to remove. Then slide out the bottom cover and set it aside.
Remove the motor unit
Carefully remove the four tiny screws that hold the rectangular motor unit in place. Pull the blue rectangular unit out of the Roomba. Run your vacuum crevice tool over the inside of your Roomba.
Clean the motor with compressed air
Carefully work to remove any dust or debris from the motor unit using a can of compressed air. Pay extra attention to any crevices and openings. However, be very careful not to vex any wires.
Reassemble your Roomba
Place the motor compartment back beneath the Roomba and tightly closed it with the four tiny screws. Pop-out the front wheel back. Next, reinstall the bearings to the rubber roller and brush, and return them to the proper compartment and close the flap. Then place the side-sweeper and secure it with a single screw. Finally, reinsert the collection tray.
How to Clean Roomba Filter
Roomba is so simple to use and it’s even easier to maintain. Just a few quick routine steps will help to keep your robot running at peak performance. Like emptying the bin after every use. This gives your Roomba a nice clean start to every job. The full bin indicator and a notification to your iRobot home app service helpful reminders.
If you share your home with pets, you should clean the filter twice a week to shake off fur dirt, dust, and dander. Homes without pets should clean Roombas filters once a week to make sure all of the robot components can move freely.
Regularly check the extractors, side brush, in front castor and remove any hair or debris. Roomba will let you know if something is wrong and even give you troubleshooting tips to help get it going again.
Use the following procedure to clean or replace the filter.
Step 1
Press and hold the bin release tab to remove the trash bin.
Step 2
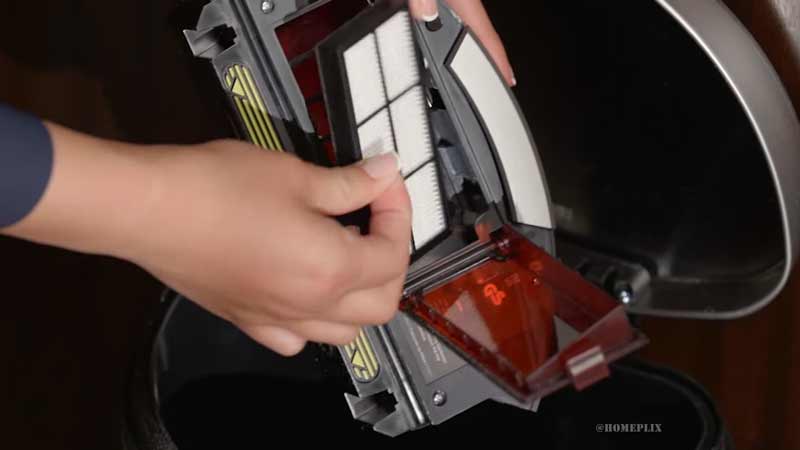
Press and lift the filter door rid the tab to take apart the filter.
Step 3
Take aside filter by grasping the yellow tab.
Step 4
Sweep off debris by tapping the filter against your trash can and then replace the filter. Filters are not designed to be wet washed.
Step 5
Press the side of the filter with the metal lever.
Final Sentences
I know that after reading this article you are ready to give me a 5-star rating. You may definitely diagnose and fixed your Roomba and happy to back up and running your Roomba!
Definitely, if there is something that needs to be fixed you can do so as long as you have the patience and the will to learn.
After reading this article you can run the Roomba troubleshooting or repair and comment back with your results, so we can assist you in finding out the cause and later fix it.

Who am I: I am a Home Improvement Specialist, Cleaning Expert, Product Reviewer. Why I write: To write a blog that broadens readers’ horizons and offer new solutions they can apply to their home. Who I write for: My family, my friends, my neighbors, myself, and most importantly you. Where do I write? homeplix.com, a blog solely focused on giving away home improvements suggestions.
I have A 650′ it won’t set A scheduled cleanin’ time or redock after I run it manually!
Hi Randy,
I think you are facing a scheduled cleaning problem or the problems may be…
1) Your target station is too distant or
2) There is a problem with your battery.
To fix the first problem you should move your home station to a more central location. For the battery problem, I would suggest cleaning the nodes on the battery first then start to think about buying a replacement battery. If you think that your problem is not solved here then you can check out our another article on Roomba Error Codes.
Thanks for sharing the problem!
My 805 roomba stops and says to clean the brushes.. Have done that.. still doesn’t work..
The Roomba says “Error 2: Open Roomba’s brush cage and clean brushes.” If you are getting this error, the most likely culprit is hair stuck on the brushes. It may be that you are not cleaning the brush of your Roomba often enough, and hair is preventing the brushes from spinning correctly.
the brushes on my roomba 562 don’t seem to be turning, i am not picking up any dirt. no error messages, it will run over the floor with no dirt in the bin.
The 562 can sense when it’s rolling over a particularly grimy area, then focus more time and suction there. That means more pet hair, dust bunnies, and other floor flotsam will get sucked into its cavernous debris bin.
My roomba is several years old. I have been told by a friend that it is not a hood idea to ever teplace the battery. ?????
No, your friend is wrong if your Roomba battery life decrease, You need to change the battery.
My roomba is stoPPING EVERYTIME IT HITS A SLIGHT CHANGE IN FLOOR LEVEL- IT HAS NEVER DONE THIS BEFORE
Fix if your having issues with Roomba transitioning to carpets, you can follow this Video.
My roomba cant quite make it on docking station. Stops about 4 inches shy, like it doesnt have enough power to get on docking staTion. It is 2 years old, worked great until rece
A washer (or 2) under the black & white ball post, lifts-up the front bump switch, so it won’t turn around when it hits the charger.
The docking problem is: The plastic bearing under the black & white ball wears down over time. This lowers the front of the Roomba too low, and when it gets to the charger, it thinks it’s hitting a wall and turns around… never docking. A washer or 2 under the ball lifts-up the front of the Roomba again.
The Roomba says : move to a new location then press clean to restart . but the roomba does not start . .
You can monitor in real-time items such as the light touch sensors, the spin brush encoder, the IR receivers, etc. Simply hold “CLEAN” and “SPOT” and press “DOCK” 3 times. Use “SPOT” and “DOCK” to choose which sensor to monitor.
Help – i have THOROUGHLY cleaned my bEloved Roomba, it runs fine however the debri will not go into tge chamber. It just stAys amongst tge rollers.
I may notice that the brushes were not moving at all on the bottom, or were extremely weak. Lubricating the motor with a few drops of oil seems to solve this problem immediately.
my rumba 650 now gets stuck on my ac grates and says move to new location and once it gets on a carpet, it won’t come off and says to move to new location. I have another rumba 650 for my upstairs. I moved it down stairs and it does just fine and runs over the grates and carpet no problem (like my old one use to). what is wrong with my one that gets stuck?
The reason that the Roomba 650 gets stuck on black carpet or floors is that it is perceiving it as a cliff. The edge sensors need to be disabled with a reflective surface. I do this with a piece of paper and tape.
NOTE: by disabling these sensors the Roomba will not sense stairs or other cliffs and will fall off, so only do this if this is not an issue in your home.
A great trick you can find in this video.
MY ROOMBA ONLY GOES IN A TIGHT RIGHT CIRCLE. CHECKED WHEELS FOR DEBRIS. NONE. DIDN’T TAKE ROOMBA APART. ANY THOUGHTS.
This video is a Guide on How to Repair iRobot Roomba “Circle Dance” 9 Beep Error.
My Roomba scheduler Has power, but when I press the clean button nothinG happens. It works if I PRESS SPOT CLEAN AND MAX CLEAN, BUT NOT CLEAN. Can someone help me?
If you have fully charged your Roomba scheduler Series battery and its charging time was very short and/or it’s run time was very short, the video battery reset procedure may solve your problem.
My roomba will run a few short swipes across the carpet then stops says it is in it’s docking sight but it is always several feet away. I have taken in apart and cleaned all area changed all the brushes but it still stops.
You need to repair a bad docking sensor on a Roomba that can’t find the base station. You can follow this instruction.
The metal piece that makes contact with the dust bin broke in one side. Do they sell this as a replacement part?
Nope! You need to change your dust bin, follow this link and find out as your model(paid link).
My 560 does not back off charging base as it use to do. It turns across the base and begins cleaning. It returns to the base and dock just fine..
You might even notice the Roomba trying to dock but then backs away. The problem is likely dirt or grime on the battery contacts. Make sure to unplug the dock before cleaning.
Hi
OUR ROOMBA ISNT FILLING THE TOP DIRT COLLECTION,BUT ONLY THE BOTTOM WHERE THE FILTER IS .
WHAT IS OUR PROBLEM?
It seems your filter is faulty, you need to change the filter. You can buy it from Amazon (paid link)
Hi. The collection bin on my 650 series keeps falling off. Any suggestions
You will need to change your bin, you will find it from here (paid link).
Roomba 770. Huge mistake by forgetting to put the filters in while cleaning. I have since dismantling and cleaning everything I can. What is now happening is that the roomba motor starts by just dropping the battery into slot sufficient to make contact. no brushes or wheels engage, just running motor. when i disengage (remove) the dust bin, the unit turns off. dust bin in, motor runs, no brushes or wheels turning. dust bin removed, unit shuts off.
i am stumped.
This video can save you from the trouble of pulling apart the whole assembly, you shortly solve your problem.
Read your material but couldn’t help my problem. Roomba was left for 6 months unplugged but woudln’t run when we replugged. Put in new battery as old one only showed 2 volts. Still won’t respond at all. any ideas??
If Roomba will not be used for more than a few weeks, store the robot in a cool, dry place. Fully charge the battery at least once every six months for optimal performance. Charging time under normal conditions is at least 2 hours.
By the way, you should clean your battery connector of the device.
I have an 880 that is several years old. Qit using for 3 years bec my husband complained of noise. I Just got a new battery & plan to use again regularlY. Im going to clean out motor with compressed air. Do i need to remove the battery before taling it apart for this cleaning. I have pets so it gets really dirty. Also it often gets stuck under edge of couch
Yeah! You can clean your 880 with compressed air but from a distance. Getting stuck problem, you need to buy a low hight vacuum cleaner like iRobot Roomba 980 (paid link).
We can’t get the wifi to turn on. I have a 670.
iRobot has a few different models of Roomba vacuums, but the Wi-Fi connected Roombas are definitely some of the most convenient. You can start or schedule cleaning from your phone, ring your Roomba from your phone if you can’t find it, and even start cleaning using Alexa or Google Assistant. You just got a Wi-Fi capable Roomba, here’s how to set yours up wifi.
Husband bought me the 17+ Roomba with self EMPTYING base for chr. Ran the train Run… or should say tried to. The roomba cleans out white tile kitchen repEaTedly . It final moved on the the liv room (tan carpet through rest if house)but it seems To do the same areas over and over leaving large spaces undone and then goes back to base – in kit and then gets trapped in kitchen again 🤦♀️ App only has in settings to change to one or two passes nothing else to change . Help ?
iRobot has made some significant advancements with its i7+. The big change is that the Roomba can now empty itself. The newest Robot in the Roomba fleet is available with a special dock that contains a dustbin so that any time the Roomba is full, it’ll head back to its base station and automatically empty itself as you say. You can see this video for know detail uses of i7+.
Just replaced my battery in the rooMba 960 and the BATTERY doesnt charge all tHe way.
Be sure that the yellow battery pull tab has been removed from the bottom of the battery.
If this is occurring with a new battery that has never been activated, the battery may have damaged during shipment. We suggest removing the battery and placing it back in the robot to ensure proper contact.
Hi John,
Bought a new 805 on ebay. it is giving error code 1 and thinks its right wheel is stuck in the down posItion. How can this be fixed? Thanks.
Hi Lindsay,
You can try every combination of everything, which is shown in the video. Even pull wheel assy to parade rest, you may found hair, you can see motor spun freely and whenever that chip is placed into the body of vacuum it’s maybe fixed!
Thanks!
aside from my 670 not turning on it’s wifi, it says error 18 when trying to dock. also the virtual wall that came with it doesn’t have an on or off switch but all of the ones in the instruction book do………
iRobot has a few different models of Roomba vacuums, but the Wi-Fi connected Roombas are definitely some of the most convenient. You can start or schedule cleaning from your phone, ring your Roomba from your phone if you can’t find it, and even start cleaning using Alexa or Google Assistant. You just got a Wi-Fi capable Roomba, here’s how to set yours up wifi.
You need to check the sensor. Wipe the sensor for solving error 18.
Completely cleaned my 761, and now the anti tangle light immediately turns on once it runs on THE carpet (never had this issue before), but turns off when it returns to the tile and works perfect. Any thoughts? Appreciate all your informative replies to all these comments.
It seems the Bumper Sensors and Cliff Sensors may be damaged or need to clean. Here you can find How to Disassemble and Replace the Bumper Sensors.
Thanks!
Cleaned rollers in 600 series; brush roller is not fitting into place & will not close. – afraid to force close it, afraid it will break. Suggestions?
This video helps you to take apart 600 and clean the gearbox for the wiper blade.
Thanks!
My romba robot Dectiveted dirty I took all apart and cleaned want charge lights on charger & dock , so I figure battery so order one put in charge in different outlet and charged it direct not with base still want come on
It seems your Roomba needs to clean battery conductor or remove plastic from the top of the battery connector, or your motherboard may be faulty, which means your charging (IC) integrated circuit need to change.
Thanks!
My 630 side brush keeps coming off how can i get it to stay on we keep losing the screw
I think you can put some glue on the head of the screw. Thanks!
I have a scheduler and replaced the battery. It worked fine the first use. I have done a reset also. It will run for a little bit the stop and the status light comes on. I do not know what that means.
If you have fully charged your Roomba scheduler battery and its charging time was very short and/or its run time was very short, the following battery reset procedure may solve your problem.
I have a iRobot Roomba 650, it squeals every time I start it, I clean it , the brushes are turning, any thoughts
Is your Roomba making a clicking/knocking noise while operating? Does it randomly stop and tell you to clean the brushes, however they’re already clean? This video will show you how to fix your Roomba.
I have a refurbished 805 Roomba. It worked perfectly 3 times. It shows fully charged and comes on when “clean” button is pushed but doesn’t run or show any error messages. I’ve taken the battery out and put back in (not replaced). I’ve rebooted and I’ve cleaned. Any suggestions?
You may find this video very helpful. In 800 series bin and rubber extractors may cause this type of problem.
My Roomba 960 wont connect to WiFi.it runs only when I start it and often doesn’t return to base on its on. It no longer shows up in my roomba app just keeps searching .
It seems that your device’s WiFi sensor may be damaged. You will need to change the Wi-Fi sensor.
I have a Dirt Dog, Discovery and I believe a 500 series. None of them will charge a battery anymore. I have replaced the batteries, nothing, I bought a charger, they will run for a couple of minutes, then stop.
Very frustrated.
HI there, thank you for quite a detailed article on how to “vacuum” and clean up the Roomba… my problem is with the Virtual Wall… it is not working with my unit, so how do I know if it is the Virtual Wall itself or the sensor which is supposed to sense the Virtual Wall, which is not working? Please help?
Hi
We had a Roomba i7 at Christmas 2019 It’s great on our tilled floor brilliant machine, at the end of February it started to fail docking and became erratic in its cleaning, we found the Tiny white D plug which connects the sensor underneath the small Sticky up Perspex cover on top of the unit had become disconnected, after pushing it home Securely we are back Up and running like new.
Thought this might be useful for others.
Why does my robot leave the base by itself.
My Roomba 550 is picking up dog hair fine, but doesn’t seem to picking up small dust / dirt. There is hair in the brushed and between the brushes and the debris bin. The debris bin has hardly anything in it at all, and this is a new change. Any recommendations?
My roomba got wet. Now my side brush stays on. Roomba doesn’t turn on. Is there any way to repair this?
I have a Roomba 650, it’s a few years old. Suddenly it will not run for more than a few feet & then stops with an error message 14. It is very frustrating!
My Roomba i7 has been running fine for a year but now has navigation issues. I thoroughly cleaned it and did a factory reset and now am trying to have it relearn and generate the Smart Map for my home. However, it seems to no longer able to properly detect walls. Narrow hallways are now merged with adjacent rooms, and it seems to detect walls in the middle of open areas. Retried many times. It seems like a sensor may be malfunctioning, but not sure how to trouble shoot. I tried different light conditions. Any suggestions?
I really like it when people get together and share opinions. Great website, continue the good work!
I have a Romba S9—fairly new. The Roomba keeps telling me to empty the bin, but the bin is already empty. What could be the problem?
I’ve read just about all the issues people have had with their Roomba’s. I have a 351 model and have kept it well maintained all these years. Now, after rolling off the charger, it stops and says, “move roomba to a new location and press start. Nothing happens. Keeps saying the same message. Can you help?
Hi. My iRobot 700 series was fixed recently but now it only goes on the kitchen and bathroom floors. As soon as I put it on carpet lasts a couple of minutes says battery is flat put it on the dock and within minutes it’s charged. Can you help me? Thank you
I keep getting a ERR 1 message on my 780. I have cleaned all the contacts, reinserted the battery, cleaned the wheels and brushes and reset the 780. But the message Err 1 appears again. A new battery was inserted and fully charged prior to getting the Err 1 message. The unit ran fine when I used it after charging the new battery but now it displays the Error message. I have connected the unit directly without the base but that didn’t work either.
Hi I cant see my problem listed. I love my robot but at times it does not pick up the dog hair thinking it needed new extractors I purchase new ones and side brushes. And I have the same problem its strange as other times it works fine I seem to think its something to do with the bin but I cant see anything thats wrong all look fine to me I alway clean the bid after each use Thank Esther
I am so happy to read this. This is the kind of manual that needs to be given and not the random misinformation that is at the other blogs. Appreciate your sharing this best doc.
What does error 3 mean? The Roomba got wet.
I CANNOT GOT MY ROBOT TO EMPTY INTO THE DUST BAG. CAN YOU HELP?
I NOTICED I SHOULD HAVE SAID GET INSTEAD OF GOT
My Roomba will go about a foot after leaving dock station, and then stops, it will say error # 8.
I have cleaned the filter, even washed it, but nothing helps!
s9 error code 31 any fix for this?
I have a Roomba 400 series that shows charged but won’t start. I tried a new battery, still wouldn’t start so I bought a new charger. Same problem.
My Roomba 676 got jarred. Now when I turn it on it hits an object and continues to keep hitting it not changing directions and says dock on it. I don’t know how to fix it and I just got it
I have a brand new roomba i3. We set it up and started it off cleaning our tile floors. It went back to home base & emptied out it’s dirt collector twice and continued cleaning. It then went back & docked but only cleaned 2/3 of the tile floors. What do I need to do???
My 805 does not want to pick up pet hair. It leaves it in clumps.
I purchased a used older model. It only has a battery indicator and s m l for room size. It lights up after I charged it all night. It starts for a half second and then just stops. Then the battery indicator flashes red. Can I reset the unit somehow or should I just get a new battery?
The clock on my roomba 650 has stopped working. When I press clock nothing comes up on the display although when I press schedule it shows up properly but because the clock is not working, it does not run on a schedule.
I have the roombai7. It will not dock. It goes off to the right every time it goes back to docking station. What do I do?
I purchased a new 980 from eBay. Turned it on today and instantly got a high pitched noise. Any way to stop the noise ??? Changed the cleaning mode to eco and that seemed to help . iRobot wanted me to replace the cleaning module. Seems overkill to me. Please help. Thanks.
hi,
i had a roomba 895 from 4 years now. During last 3 months when it’s going back to the home base it seats perfectly but then the docking station doesen’t recognize that it’s back and is not charging. Usually when roomba is back on the docking the green led ont he dock turns on and then immediately roomba charges (if it still has some life left in the battery) or the green lights on the dock turns on and the ones around the cleaning button starts to flash and then you hear a sound and it starts to charge. Now none of that is happening, the docking station desen’t recogize it. i’ve cleaned the charging contact, I’ve already changed the docking station and the battery, in the firs 3/4 days everyting seems normal and then the problem cames back. Is it the motherboard to change?
The gray flap inside my iRobot Roomba e6 has torn in several places. IRobot customer service said that they would refer my case to another department. It has been a month and I have not heard back from them. The wires are now exposed and I cannot use my roomba. Is there an easy repair or a replacement gray flap that I can install?
What causes a side brush to not spin, causing the vacuum to stop.
My Roomba makes a sound in the charger or out that sounds like a spark-could the battery discharge itself? Sound is more often ( about once every 45 seconds) in charger. Also leaving off charger unit for a week makes it go dead?
My Roomba seems to run just fine after replacing the cleaning head but it does not put dirt into its bin. Lumps up just outside the opening. What could be problem?
I have a roomba 980 and the trash can light stays on. I have called Roomba and they said to send it in for repair. $130. plus shipping. I have cleaned the robots sensors inside and out. Cleaned the garbage box, replaced filter, rebooted machine. I also removed the battery and reinstalled it. Do you have any suggestions? Will it hurt just to run the robot with the trash can light on? Would a new battery help?
any suggestions would be appreciated.
Hi there! My Roomba will not spot clean anymore on the carpet. That feature works on my hard floor, but no longer on my carpet and it used to. Now when I push the spit clean button, it starts then just turns off. It gives a error sound but doesn’t state a code or problem.. I’m like, What the heck?! Please help, as I love this feature! Thank you!
Hi John, I have a model 677 roomba, I just replaced the trash bin contact terminals, one of them was broken. However now when I click clean button, it just spins around (in circles) it self and not move forward or backwards as normally do.
Hi John, I have a model 677 roomba, I just replaced the trash bin contact terminals, one of them was broken. However now when I click clean button, it just spins around (in circles) it self and not move forward or backwards as normally do
Hi
My 560 stops after a few seconds and the red triangle light comes on,NO sound or beeps made battery is new but getting very hot to charge and won’t let me reboot it..any ideas please
What does this mean and how to do it?
Remove Yellow Pull-Tab
Where on what? how?
I am getting Error 5 message
I have a Roomba 614 that stopped working after vacuuming some fine-powdered diatomaceous earth. I fully charged it, disassembled everything that would take a screwdriver, cleaned everything, and tried the long-clean-button reset.
When I press clean, it gives one short beep, the wheel and brush motors move slightly then stop. The uh-oh sound then plays and the red indicator lights up. It doesn’t give me other clue about what the problem is. Any suggestions?
I have not used my iRobot this past year. It is charged with a green rectangle showing .
When i push the Clean button it signals & tries to start but stops showing a red triangle with a ! Inside.
What’s wrong? I can’t find that error anywhere online.
I have an I4 and the replacement bags I bought (not official iRobot ones) didn’t quite fit so the lid would not close and the light was red. I inspected the old one and found the gray canals on the frame of the bag were pretty clear while the replacement bag had ridges of extra plastic that were hanging up the bag insertion. I trimmed those ridges and the bag went in, the red light turned white and I was able to close the lid.
My iRobot does middle area then edges. Brush pushes small bits out from edges into middle. However after edges robot leaves to next room leaving what it pushed out. Has no problem picking up when I sweep left behind into its path. I need to follow it with broom when it does this to put leftovers into next room for it to pickup.
I have a Roomba 630. It started going in circles, the right wheel had more resistance than the left wheel going forward. I replaced the right wheel module and it’s stiill going in circles and now the new wheel is stiff. What’s the problem?
I have Roomba 800 it spins for few seconds and stops , showing error Triangle and says error 11 ? what it is this error and how should I fix it Thanks
I have a I series — had about 4 years. replaced the battery over a year ago — it’s not vacuuming as long and will not return to base– do I need another battery?
I have two roombas, a 980 and a 960 (battery beginning not to hold a charge as long) can they not clean together and recognize they are cleaning together? If so how? I’ve searched on the app- nothing, and they seem to not be communicating even though they are both on the same Acct???
The braava is a life saver as well!